Blogs

REI Co-op Flash 45 Backpack Review
Altra Lone Peak NeoShell Mid and Low Review
Summer Giveaway
Spring Giveaway
Winter Giveaway
Marmot Plasma 30 Sleeping Bag Review
Altra Lone Peak 3.0 Initial Review
ZPacks Multi-Pack and REI Gift Card Giveaway
Altra Lone Peak 2.5 Review
REI e-Gift Card & TrailGroove Giveaway
Exped REM Backpacking Pillow Review
Fall Giveaway
Altra Lone Peak 2.0 Review, Comparison to 1.5, & Initial Thoughts on the 2.5
Premium Membership and New Ways to Read
August Giveaway
Casio Pro Trek PRW3000 Watch Review
Black Diamond Ion Headlamp, REI, and TrailGroove Giveaway
Patagonia Houdini, REI, and TrailGroove Giveaway
Altra Lone Peak 1.5 Trail Running Shoe Review
Custom Hybrid Cuben ULA Circuit Backpack
ZebraLight H52w Headlamp Review
TrailFinder
-
Blog Entries
-
 By Aaron Zagrodnick in TrailGroove Blog 5While backpacking during an all-day rain presents its own challenges when it comes to staying dry – or as dry as possible – protecting your gear and the items in your pack that must stay dry comes with its own set of considerations. Having a dry jacket, clothes, and a dry sleep system at the end of a long rainy day is not only backpacking luxury, it’s also critical to our safety on the trail. And whether rain is in the forecast or not, in most backpacking locations we still need a strategy to keep our gear dry in the case of an unexpected dunk during a creek crossing, or even in the event of a leaky hydration reservoir inside our pack.
Keeping gear dry comes down to using the right gear and utilizing the right techniques.
Pack Covers
Most backpacks themselves are only water resistant – many packs are made with a PU coated fabric that is waterproof to start but becomes more water resistant over time, and even when new, with backpacks that are made from waterproof materials the seams and zippers (if so equipped), not to mention the huge opening at the top of a top-loading pack, are still waterproofing weak points. In reality, true waterproof backpacks are quite the exception and are often targeted more towards those who prefer to paddle instead of walk. A traditional solution is an optional or aftermarket waterproof pack cover that one can deploy over the outside of the pack. This is a decent solution for a rainy day, but won’t have coverage on the backpanel of the pack, and isn’t the best solution for an unexpected dip. Perhaps the biggest downside of the pack cover is that it must be deployed and undeployed – making it one more task to deal with on a rainy day compared to a set and forget system.
Dry Bags / Pack Liners
In contrast, a pack liner goes inside the pack and is always used – so if a sudden rain shower pops up during the day you likely only have to worry about donning your rain gear and not protecting the contents of your pack. Pack liners can be anything from a dedicated solution (most are like giant dry bags), to a trash compactor bag (twist the top closed and tuck to secure) that is a budget replaceable option. Due to lack of durability, normal trash bags are not recommended. Either way this option protects from rain water intrusion quite well and even from a brief underwater dunk as well. Smaller, separate roll top dry bag stuff sacks can be used in place of, or in conjunction with a rain cover / pack liner approach. This technique offers redundancy and also allows for some more refined compression of your gear.
Waterproof roll-top stuff sacks are a go-to for sleeping bags and insulating clothing.
In recent years one other option has become popular with the rise of the ultralight inflatable sleeping pads – the combination dry bag / inflation stuff sack. As long as it is a completely waterproof, roll top option, this makes for a great dual use item and this is how I personally store my “must stay dry” items during the day – sleeping bag, sleeping pad, jacket, and any other spare clothes.
Whether you go with a pack liner, cover, or dry bags I like a “pick any 2” approach to waterproofing and especially as all my insulating gear – sleeping bag and jacket are both typically down. For example a trash compactor bag or pack cover combined with ultralight dry sacks for those items of greatest concern is great insurance, or a pack liner on its own if you have a particularly waterproof pack (roll top design utilizing hybrid waterproof Dyneema Composite Fabric for example).
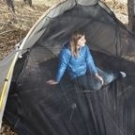
Some other techniques that can be helpful is a (often overlooked) large enough shelter or double walled tent solution – a shelter large enough gives you room on high condensation nights so your bag isn’t making contact with tent walls covered in condensation. Your sleeping bag DWR will help for the occasional brush against a wet tent wall, but will eventually wet out. Carrying a small bandanna or camp towel is also helpful here. On humid trips that feature multi-day precipitation events this is quite important since your gear will have very limited opportunities to dry in these conditions. If you gear does absorb some moisture and is packed away first thing in the morning (into a waterproof system that will now not allow anything to dry), make sure you take an opportunity over lunch to get things out in the sun if possible and / or get everything out to dry immediately upon arriving at camp.
This trip was defined by near constant precipitation for days on end, but utilizing the right gear and techniques kept gear from getting soaked.
Backpacking Odds and Ends for Dealing with Rain
For any other odds and ends that might not be stored in the main compartment of your pack, I stick with the same pick 2 approach for waterproofing and luckily, these items will likely be few such as your map and any electronics you might carry. Quart to gallon Ziploc bags were almost tailor made for waterproofing maps – even waterproof maps will have ink run or stick together after getting wet – and any electronics from cameras to smartphones.
For an upgrade, one could also utilize smaller roll top dry bags – either the waterproof nylon or Dyneema varieties like those offered by Zpacks. I also like to store these items in something like a water resistant bag such as the ZPacks Multi-Pack for that additional layer of waterproofing. A couple other safety related items should always stay dry as well – like your fire starting solution and nobody likes a soaked first aid kit or toiletry type items. These however, are stored in the main compartment of my pack in their own dry bag.
Rain ahead: A dialed-in system offers peace of mind when your drive to the trailhead looks like this.
Final Thoughts
Different approaches (and price ranges) exist, but whether you go with trash compactor bags and Ziplocs, opt for top of the line Dyneema roll top dry bags, or some combination in the middle, once dialed in that system will ensure that our critical gear stays dry and offers peace of mind no matter the forecast. And from the occasional water crossing incident to trips that feature consecutive days of precipitation, there’s not much that can compare to crawling into a dry and warm sleep system at night on those types of days while keeping the rest of the gear you need to stay dry, dry along the way. For more on overall strategy on backpacking in the rain, take a look at our article: Backpacking in the Rain: Dealing with the Deluge.
-
 By jansenjournals in TrailGroove Blog 2While any thru-hike will involve an uncountable number of steps, the biggest step of them all is the proverbial first step – making the decision to go hike the trail yourself. After you’ve watched the videos and read the articles, the inspiration is at its highest, and you finally decide to hike a long distance trail, the second major step into the world of long distance hiking is preparing to walk – up to 25 miles every day for up to 6 months straight.
Is Hiking the PCT a Physical or Mental Challenge?
What I found after hiking the length of the Pacific Crest Trail was that thru-hiking isn’t so much a physical feat – and while you certainly have to be in good shape to hike a long trail – the mental challenge of a long hike is worth just as much, if not more consideration than the physical aspect of a long distance hike. And then there’s the question: is it possible to only hike one long trail?
Now don’t get me wrong, getting in shape before a thru-hike can save you from injury and make your hike more comfortable, and getting your footwear dialed in can save you from misery. But that being said, the worry of training for walking 4-6 months can be overwhelming. There’s no reason to stress however: and it’s always best to start with some hiking around the local woods near home or even around the neighborhood. This will prepare not only your body, but more importantly your mind for the endeavor ahead. Another great thing to start doing is trail running. A few miles a day to even 10 a week with slow gains from there to get your muscles in tune. You do not need to be in shape to start hiking a long distance trail, but some pre-hike exercise never hurt anything. At least, that’s what I wished I had done.
Training for the Pacific Crest Trail
Training for my 180-day trek from Mexico to Canada through all of California, Oregon and Washington began on the trail itself however – and I wasn’t alone in this shared endeavor. Looking back, if I had trained physically for my hike, I would have sky rocketed in front of some of the fellow hikers I shared this misery with and would not be able to still talk with them to this day about it – while the scenery of course held its own, the friendships formed on the trail were the most memorable experiences for me on the PCT. Somehow and whether you choose to train extensively prior to your hike or not at all, whether you choose to resupply with carefully planned mail drops or strap a pizza box to your pack on the way out of town instead, things seem to find a way of working themselves out on a thru-hike once you get yourself to the trailhead.
Meadow View - Thru-hiking the PCT
Emotions and Intangibles
From blisters to aches and pains to ankles and knees, all thru-hikers are likely to experience some form of physical discomfort on their hike, but pushing through these setbacks is best accomplished by keeping your reasons for hiking the trail in the first place in the forefront of your mind. The most common reason I saw people drop off trail wasn’t injury, it was worry related to a job or the missing of a loved one at home. The hikers that finished the trail seemed to have an almost inner voice driving them to the border. Possessed with passion to reach that monument, not sacrificing anything, with perseverance to setup the tent yet again after a marathon day in the pouring rain, wind slapped desert, or mountain pass snow storm.
Reasons for starting a long trail vary as much as those for leaving one early. In my case, I began my hike to get away from a relationship. For others, thru-hiking served as an escape from job related responsibilities and struggles, financial burdens, or any of the number of things we face in everyday life that we can to some extent, escape on the trail. But I don’t think any of us hiking for these reasons could escape these thoughts completely. For many of us, every day we crawled out of the sleeping bag and kept walking was like putting on the boxing gloves and meeting these emotions in the ring. There were of course good days and bad, but those that continued on and finished the trail were the ones that won the fight.
Post Traumatic Trail Disorder after Hiking the PCT
Even finishing the entire trail comes with its own set of problems however: post trail life. Many of us joked about having PTTD, or Post Traumatic Trail Disorder. When accomplishing a goal like a thru-hike and spending that many days in the grasps of nature, then returning to the life of old off the trail, post trail depression is a real struggle for many thru-hikers. When the only worries of the day on-trail were where to get water for the day or where to camp, when you return home to relationships, bills, a mortgage, or rent, it can at times seem that we end up right back where we started. Those that managed these emotions the best were the ones that kept hiking the following season or jumped to the other hemisphere chasing the forever changing trail season and kept escaping…or perhaps more accurately began to rewrite their narrative such that the line between on-trail and off-trail life began to blur.
Hiking Through a Tunnel on the PCT
Thru-hiking: A Hike that Never Ends
Through thru-hiking I found joy in writing, have been blessed with countless photos and memories, and have been fortunate enough to share stories of the hike across many platforms. Lasting friendships were formed. Physically the hike helped me obtain a level of fitness that had previously been unobtainable. I witnessed beauty beyond my wildest dreams and fell deeply in love with nature. Things that, after the hike are all tough to come by. Every time I sit down to write about topics like this I’m reminded of what it’s like to be out there, and perhaps there’s only one solution to fill the void. One day it seems unavoidable that I’ll find myself at the terminus of another long trail, the fog will lift, and the blissful experience of putting those trail runners one foot in front of the other for thousands of miles will start the cycle yet again.
"Cowboy camping" on the Pacific Crest Trail
About the PCT
The Pacific Crest Trail is a long distance hiking trail in the western United States with the southern terminus located along the Mexican border in southern California. The trail runs nearly 3000 miles north to the Canadian border, passing through many national parks and trail towns along the way. A thru-hiker has the opportunity to climb Mount Whitney (the highest peak in the contiguous U.S.), pass through the Sierra Nevada, and explore Lassen Volcanic National Park, just to name a few highlights. The trail is more of a mountain trail, primarily staying inland from the extreme west coast. A PCT thru-hike is considered one of the premier long distance hiking opportunities in the United States.
Many trail angels exist that will often provide water, food, or even lodging for hikers. The entire hike takes most thru hikers months to complete. Many hikers will form a trail family of sorts, with certain groups of thru hikers of the same pace loosely or not so loosely hiking the trail together. Like the Appalachian Trail, the PCT has an association to help hikers. The Pacific Crest Trail Association provides news for hikers and can assist with permits.
Prior to hitting the trail check out the National Geographic Pacific Crest Trail Map Pack as well as the Pacific Crest Trail Data Book.
For more on Sean’s thru-hike of the Pacific Crest Trail, check out The Pacific Crest Trail: A Thru-hiking Journey on the TrailGroove Blog.
-
By Aaron Zagrodnick in TrailGroove Blog 0The past year or two I’ve become a fan of at least on occasion, heading out on a trip every now and then that involves a day or two of backpacking into the wilderness with a particular destination in mind, then staying a couple nights exploring in that area. As a backpacker who’s also a fly fisherman, a secret lake in the wilderness is often involved on these trips. In contrast to the more typical backpacking trip of packing in the miles and moving daily, these types of excursions allow you to really learn the nuances of a specific area, with plenty of time for side trips with a lighter pack to bag a peak, find a secret meadow, or to explore in between the contour lines of your map without the pressure of having to make the miles.
Many years ago I took the Alite Monarch Chair on one of those trips and it makes for a great way to relax in camp, when you have more time to do so. However, while light and comfortable, the 2 legs of the Alite don’t quite allow for a complete don’t-even-think-about-it lounging experience. The Helinox Ground Chair offers this, as you’d expect, with a weight penalty. But if you’re already packing light a little extra weight can sometimes be worth it if it’s not slowing you down. And though I’d originally thought that a chair is only valuable when you’re staying multiple nights in the same location, I’ve found they’re starting to be thrown in on all my trips – whether an out and back to stay at an alpine lake for 2 nights, or sometimes even on an extended trip pushing the mileage daily if I feel it won’t slow me down.
Although it's not the lightest chair on the market, the Helinox Ground Chair provides class-leading seating comfort as long as you like a more relaxed, lounging position.
Helinox Ground Chair Design & Specifications
The Helinox Ground Chair is supported by a DAC aluminum, shock-corded pole structure with 4 plastic feet doubling as a hub for the pole system. The entire pole structure and feet are in effect one piece, and when assembled 4 sections point upwards and fit into corresponding, color-coded, reinforced pockets on the chair’s seat. The seat is a ripstop, heavy-duty fabric with lighter mesh, breathable side panels. The chair supports up to 265 lbs. A stuff sack is included, and disassembled, the chair will pack down to a fairly compact listed size of about 11.8 x 4 x 5 (inches). Listed weight is right around the measured weight per Helinox, but be aware that many retailers have the chair listed as several ounces lighter.
Measured Weight in Ounces:
Pole System: 14.05
Fabric Seat: 7.7
Stuff Sack: .75
Total: 22.5
The fabric seat slips easily onto the pole system; silver side goes up.
In Use and on the Trail
Assembly seems complicated with so many parts, but it’s pretty easy to figure out in about a minute, and if you forget Helinox has been kind enough to even print the instructions right on the bottom of the chair itself. One thing you’ll want to be sure to do is to fully insert each pole into its housing for maximum strength. Although the cross bars at the bottom of the chair don’t rise too much, I’ve never had an issue with interference from uneven ground or rocks. The feet will however, sink into soft soil, but in general if the ground is good enough to setup camp, you should be fine…for example while the soft, volcanic soil in Craters of the Moon National Monument did pose some issues, I’ve never had any problems with the typical ground found in the mountains.
Using the chair is a comfortable experience – it’s even doubled as extra seating at home on a few occasions – and you can either choose to sit more upright with your feet closer to your body or lounge in a legs-extended manner. After a long day, it’s definitely easy on the back. In all cases the chair proved to be quite stable, and never felt tippy when used on flat ground. Use on sloped ground isn’t ideal though, and if there’s no flat ground available you’ll probably want to keep the Helinox packed away, but again in a campsite that would normally be chosen, it should work well. While the chair does sit low to the ground, getting out of it doesn’t require a lot of effort or any difficult balancing and timing. The Ground Chair is more of a lounger (which I prefer) compared to other options on the market with a more upright seating position, although something like the NEMO Moonlite Elite – you can find our full review in Issue 56 – aims to provide the best of both worlds via an adjustment system.
I’ve found the chair to dry quickly as well, giving you a dry place to sit after a rain. Packing is quick, and I’ve used both the stuff sack or have left it behind to save a little weight, wrapping the poles within the fabric of the chair. While hiking, I’ve both stowed the chair inside my pack as well as in an outside pocket.
The Helinox Ground Chair packs up quite small, and I'm typically able to find a place to stow it inside my pack, or secure it on the outside without any issues.
Conclusion
Overall the Helinox provides an easy to carry, easy to setup / breakdown, stable, and comfortable back-supporting solution for lounging in the backcountry. The only real problem I experienced with the chair was some sinking in soft ground, but that ground was so loose it wouldn’t even hold a tent stake – perhaps I should have chosen a better campsite in the first place. Whether the weight is worth it is up to you, however with my pack already light enough to not be a burden, the only time I’m concerned about weight these days is on a long trip where taking a lot of food poundage is required, or on trips where I need to carry a lot of water.
That said, if you're set on taking a backpacking chair but are looking to do so for less of a weight penalty, the Helinox Chair Zero and the REI Flexlite Air Chair are worth a look, both having a more upright seating position when compared to the Helinox Ground Chair. Note that the Chair Zero's seat will fit the Helinox Ground Chair's pole system, and can save you a few ounces via its lighter weight fabric.
Regardless of weight, for shorter trips and overnights, there’s nothing like watching the sunset from the comfort of a chair during dinner, or watching the sun rise over coffee the next morning. While I wish and feel the chair could be a little lighter, and it would be nice if the price were a little lower, the comfort of the Helinox Ground Chair is hard to beat in this weight range.
The Helinox Ground Chair retails for $130. You can find it here at CampSaver and here at Amazon. For a wide selection of packable camping and backpacking chairs, you can also check out this page at REI.
Editor's Note: This review originally appeared in TrailGroove Issue 23. You can read the original article here for additional photos, pros and cons, and our rating of the Helinox Ground Chair.
-
By Aaron Zagrodnick in TrailGroove Blog 0Water treatment in the backcountry reminds me of backpacking and hiking footwear just a bit – if you’re not thinking of it when you’re out on the trail, you know you got it right. On the flipside, a water filter or purifier that clogs halfway through a trip will have you baby-sitting a device possibly for hours the rest of the way; a situation to certainly be avoided. In this article we will take a quick look at the best water treatment options currently available.
Note that there are many ways to go about treating your water in the backcountry, however for the purposes of this article we’ll stick with mechanical treatment. Boiling and chemical treatment can also be used but is not as common (except for melting snow in winter), and my take is that these methods, other than on winter trips, are best utilized either as a backup or for niche ultralight type scenarios. Caveats stated, on to the article.
Best Backpacking & Hiking Water Filters
For those that are packing fast and light style and don’t have much time in camp or time for breaks on the trail, and need to only process water for themselves, Katadyn offers their BeFree 1.0 liter system ($45, less than 3 ounces) that offers hollow fiber filtration in a very lightweight, fill-and-drink-as-you-go type of approach and a 1000L rated capacity.
This would be a suggested option due to its manufacturer-approved integrity test – which I feel is mandatory on any water filter (it just happens in the backcountry – was that small drop too much...did it freeze?). This same BeFree filtration design has also been utilized in their BeFree 3L gravity system ($80, 7 ounces) and the larger capacity BeFree 6L gravity system ($120, 9 ounces).
For more traditional backpacking with time in camp and perhaps a lunch break appreciated, pump or gravity filters come into play including the latter 2 BeFree options above. For my backpacking, I particularly like the Platypus GravityWorks system ($135, 12 ounces) – you can read our GravityWorks review here. This system may be a little cumbersome with all the hoses but offers reliability, plus the ability to hang the dirty water bag and let gravity do the work. I use the 4L system, but for groups a 6L GravityWorks system is available.
Platypus also offers their QuickDraw 2L water filtration system ($80, 6 ounces) that is backflushable and integrity-testable. This is a unique setup that you can use multiple ways – connected to plastic bottles, to the included reservoir, etc. – depending on what works best for you.
Pump filters like this Hiker Pro have been a go-to for decades and are the classic choice.
Traditionally however pump filters have been the backpacker’s choice, and these filters are still relevant today. However, there are the same hoses as a gravity system to deal with and moving parts are introduced along with some associated weight. Cleaning becomes complicated, maintenance is often increased, and there is more to break. If you like to keep it old school here the Katadyn Hiker Pro ($100, 11 ounces) and the MSR MiniWorks EX ($130, 15 ounces) should be considered. However, unfortunately with no integrity test you’ll have to be especially careful in regards to freezing and drops etc.
If an inline (with your hydration reservoir) water filter is something you’d like to explore, the MSR Thru-link Water Filter ($55, 3 ounces) is great on price and weight, although you’ll need to do just a little work to integrate into your own setup. However, quick-connects are provided that makes this easier. This filter filters to .2 microns and features activated carbon to improve water taste and quality along with a manufacturer-approved integrity test.
Gravity, inline, squeeze-type, or pump….see or our full Backpacking & Hiking Water Treatment Guide for pros and cons and more. Hollow-fiber water filters have come to dominate the backpacking and hiking market and for good reason – they typically offer reliable performance, can typically be backflushed / cleaned, and are very light. For more on how to maintain these filters see our hollow fiber water filter maintenance guide.
Summary: Best Backpacking & Hiking Water Filters
Katadyn BeFree 1.0 liter
Katadyn BeFree 3L gravity system
Katadyn BeFree 6L gravity system
Platypus GravityWorks 4L
Platypus GravityWorks 6L
Platypus QuickDraw 2L
MSR Thru-link
Best Hiking & Backpacking Water Purifiers
While you can add in certain methods to your water processing process with a water filter such as an inline carbon element and / or UV treatment, there are times when a water purifier may be a better choice depending on your backpacking destination and your own comfort level.
To further treat water, UV devices and / or carbon filters can be added into your water treatment routine if needed.
I’ve used several purifiers in the past that utilize electro-adsorption technology and while these products hands down produced some of the best tasting water I can imagine, the cartridges quickly clog. If backpacking, you’ll be buying plenty of cartridges and long trips are tough. Even day hiking and processing typical backcountry water can be difficult. While these types of purifiers may be suitable for travel-type purposes or one-off hiking trips, for more frequent use, they are difficult to use when larger volumes of water need to be processed.
Electro-adsorption purifiers have produced the best tasting and cleanest treated water I've ever experienced in the backcountry. They've also been the fastest to clog.
For backcountry water purification, and when the best resulting water is desired in an all-in-one type product and something like viruses may be a concern, the MSR Guardian water purifier ($400, 17 ounces) is a go-to choice. You will pay a weight penalty here, as well as a price premium for that matter, but the Guardian is a unique water treatment device – first of all it is a purifier, not a filter – and secondly it can withstand freezing temperatures and drops from up to 6’, both of which are quite unique. Additionally, it has a self-cleaning design and can output up to 2.5L a minute. There is no carbon in this purifier.
That said, if you prefer the more laid-back, gravity-style approach, MSR now also offers a Guardian Gravity water purifier ($310, 18 ounces). While sharing the name of the Guardian pump system, this cartridge is a bit different – it’s not rated for freezing or drops, but MSR does detail an integrity test you can perform on it if you’re not sure. It also differs in that a carbon stage is included to further polish your water. Output will also be slower and in the .5L / minute range, so make sure you have a little time…but if you’re like me, kicking your feet up while gravity does the work is not a bad way to go about it.
Summary: Best Hiking and Backpacking Water Purifiers
MSR Guardian Pump Water Purifier
MSR Guardian Gravity Water Purifier
Conclusion
Every destination is different in regards to water quality, and this is one of the first things to do when it comes to planning for an upcoming trip. If your destinations are all higher mountain destinations and you are picky about where you get your water, it’s possible that one product can cover all your water treatment needs.
That said, if your adventures take you from the desert to the mountains and everything in between, it’s likely you’ll either collect another product or two over the years and / or add-in methods to further process the water you’ll drink. In the end, there are a lot of tools in the toolbox and when it comes to your backcountry drinking water, it’s best to use the right tool for the job at hand.
For more background on water treatment methods, what we need to treat for, and water treatment strategy, see our Backpacking and Hiking Water Treatment Guide. You can also find a list of available water filters and purifiers here at REI Co-op.
-
By Aaron Zagrodnick in TrailGroove Blog 0While the popularity of using trail-running shoes or otherwise trail-appropriate low shoes for hiking and backpacking has only risen in recent years and continues on that track – my hiking included – there are times when only a proper boot will do.
Take a look at our footwear guide (by season) for help deciding between a low shoe or a high hiking boot. And while the trail-runners vs. boots debate (as with all trail gear) will surely only continue, if you’ve decided on a boot, in this article we’ll look at some of the best breathable, waterproof, and winter boots for your next hike.
Best Summer Hiking & Backpacking Boots
For summer conditions a mesh, breathable boot will be in order. Mid-height boots are of particular relevance to these hot and dry conditions, while keeping things lighter weight than a high hiking boot, and with breathability increasing foot comfort (and less chance of blisters). Unfortunately, boots meeting these criteria are few and far between.
With a trail-running shoe heritage, the Lone Altra Peak Hiker series (non-waterproof, $160) is a top choice in this category with plenty of room for your toes, and could be an especially suitable choice if you can’t decide between a boot and a trail-runner. This boot is mid-height and lightweight with zero heel-to-toe drop, but with a sufficient stack height for moderate cushioning as the miles go by. This is a proven shoe-based design and if you’re looking for a minimal hiking / backpacking boot (but not too minimal) for summer hikes look no further.
For something a little more traditional take a look at the Merrell Moab 3 Mid hiking boots (non-waterproof version, $150) in the men’s version or the women’s version. This in a more traditional hiking boot fashion has a significant leather overlay – not the best for dry times in my experience, but the added durability that leather offers over mesh cannot be questioned. However, rather than completely encapsulating your foot in thick leather like a traditional boot, this mid-height option has a nice mix of leather and mesh for breathability on those summer hikes. Vibram soles round out the package. However be aware that these boots have a higher 11.5mm drop from heel to toe; these will be more like a traditional boot in that regard. This boot is available in standard or wide sizes.
Although a winter scene is shown here, you can see how leather has a propensity to soak up water. Dry time is long. Leather will require more maintenance. See our gear maintenance & repair guide for details on waterproofing leather boots.
Summary: Best Summer Hiking & Backpacking Boots
Altra Lone Peak Hiker
Merrell Moab 3 Mid (Ventilated)
Best Shoulder Season / Mild Winter Boots
It seems like every manufacturer wants to throw in a Gore-Tex or otherwise waterproof lining to every boot that steps off the assembly line, and while this wouldn’t be my first choice for summer hikes as we’ve previously covered, these boots are perhaps the most versatile and are the bread and butter category of hiking boots. One of my favorite mainstream manufacturers – Vasque – typically had some of the most solid offerings in this category for as long as I can remember, with good fit options. Sadly and as they’ve ceased operations just recently, we need to turn to other options these days.
In this category you’ll find the boots that are perfect for dealing with light moisture or snow and possibly chilly conditions. Additionally, they can be used in summer (albeit with sweaty feet and slower-drying boots), and pushed into winter as well especially with hiking / backpacking gaiters and if you use a vapor barrier liner system and warm socks.
I’ve found just about all boots in this category seem to run a bit narrow and tight in the toebox, other than Altra, thus I have to either size up into a new size for width, or go for a shoe that comes in wide widths or is by default wider than average. Obviously, the wider shoe in the right size is the better choice than sizing up to gain width.
Gore-Tex liner in a waterproof / breathable hiking boot.
One perennial and popular choice can be found in the Salomon X Ultra 5 Mid GORE-TEX hiking boots ($190). Salomon in the past ran their metal eyelets all the way down the boot which I never found to be comfortable, but thankfully this has been updated on recent models. The X Ultra series can be found in both men’s and women’s versions and offers an all-around, middle of the road feature set. This boot has an 11mm heel-toe drop.
Merrell offers their very popular Moab series here in the Merrell Moab 3 Mid GORE-TEX ($190). While a leather boot – which I like as a natural material, but do not like due to long dry times and a propensity to soak up water – Merrell has luckily designed this one with plenty of ventilation boosting and weight saving cutouts (it has never made sense to me to make a Gore-Tex boot, and then completely encapsulate it in leather). This boot has an 11.5mm drop which as a zero-drop guy, I feel is high but this would be a choice if you like a traditional hiking boot type of feel, but are looking for something lightweight and more mobile.
If you perhaps already hike in the Altra Olympus trail running shoe in the summer, then a cushioned yet zero-drop boot would be a logical choice for wetter hikes. The Olympus 6 Hike Mid GTX adds the height, although Altra (back to leather) has covered most of the shoe with it. That said, if you are an Altra and especially an Olympus fan, the fit and ride might override this for you. We’ll keep fingers crossed on a GTX Lone Peak Mid, however Altra did just release the Timp 6 Mid GTX Boot. Stay tuned for updates.
Previous stated caveats aside, if you’re looking for a tough, traditional leather, Gore-Tex, higher backpacking type boot that comes in regular (even narrow!) or wide sizes, look no further than the Lowa Renegade EVO GTX series ($280) for a solid, classic example in this category.
And on to high stack height enthusiasts, Hoka has you covered with the HOKA Kaha 3 GTX hiking boots that have around an 8mm drop but all the way up to a 40mm stack height in the heel.
Summary: Best Shoulder Season / Mild Winter Boots
Salomon X Ultra 5 Mid GORE-TEX
Merrell Moab 3 Mid GORE-TEX
Altra Olympus 6 Hike Mid GTX
Lowa Renegade EVO GTX
HOKA Kaha 3 GTX Hiking Boots
Best Deep Winter / Cold Weather Hiking & Backpacking Boots
When it comes to deep winter and extreme cold, you can only push a typical waterproof / breathable boot so far. At some point, insulation will be needed. This will vary person to person, and depends on conditions, but for me I find around 10F or colder to be about the point where I’ll reach for an insulated boot over one that’s not. This adds a bit of weight, but warmth is worth it.
In this category breathability is less critical – the outside of your boot will likely be frozen anyway. For warmer (less cold?) conditions in this category we can look to boots very similar to the section above but with a 200g insulation layer added as can be found in the Merrell Thermo Chill 2 Mid waterproof boots ($150). which gets you a boot pretty close to the bread and butter category of boots we’ve previously discussed, but with an insulation boost for cold weather.
Thick socks will only go so far; for very cold conditions a properly insulated boot will be needed.
However for more extreme conditions you will ideally want to go with more of a boot that has been designed from the ground up for winter and cold conditions. The Salomon Toundra Pro ($200), with Aerogel insulation and a -4F (stationary) comfort rating offers additional warmth and a higher cut along with an overall design more suited for deep winter conditions from the tread on up. This one can be hard to find as of late. You can try at the aforementioned link and also at REI: men's and women's.
If that’s not enough, a proper bunny boot may be in order. Take a look at Alaska Gear Company’s Bunny Boot VBX ($260-$390) – this one is insulated with waterproofed wool felt insulation and comes in several temperature ratings (rated to as cold as -79F!) depending on your exact needs. If you’ll be hiking through extreme cold and deep snow and also need your feet to be warm while stationary, a boot of this nature will be the best suited option, and frankly, the warmer the better when it gets this cold.
Summary: Best Deep Winter / Cold Weather Hiking & Backpacking Boots
Merrell Thermo Chill 2 Mid Waterproof Boots
Salomon Toundra Pro
Alaska Gear Company Bunny Boot VBX
Conclusion
The benefits that a mid or high boot can offer cannot be replicated by a low hiking shoe. However, choose carefully – extra weight on your feet weighs more than extra weight in your pack. That said, if you’re headed out on an expedition type trip with a heavy pack or hiking in deep snow there are indeed times when a boot can make all the difference.
As with all footwear, hiking or not, fit is the most important consideration here along with the features you need – nobody enjoys having to stop on a lunch break to fix hot spots or worse having to constantly battle blisters on a trip. Likely, the best hiking boot for you will be the one that simply fits the best (note that all boots detailed here are available in both men’s and women’s versions and many in various widths). After that, so long as the boot is sufficiently durable, warm enough and waterproof enough, and not overly expensive for the budget, all you have to worry about is where those boots will take you on your next trip.
For more on features to look for and selection strategy, see our article Choosing the Best Backpacking & Hiking Shoes or Boots. If you've decided to go with a shoe however, see our Best Hiking and Backpacking Shoes by Category article. For a full selection of hiking and backpacking boots, see this page at REI Co-op.
-

-
Current Deals
Premium Members: Get a free Gaia GPS Premium Subscription for a year ($60 value) to use with the GaiaGPS smartphone app. Full details here on the Premium Gear Deals and Search Page
REI: Shop REI Co-op Sale & Clearance Items on REI.com
Zpacks: Lightweight and roomy, the Duplex Tent weighs just 19 ounces and sleeps two people with two doors and two vestibules. Learn more here at Zpacks.com
Amazon: Click Here to View All Backpacking & Hiking Gear with Free Shipping (Over 10000 Items)
Topics
Subscribe
Join 15k+ Subscribers